DIY Mounting G-TRAK Wall BracketsUpdated 5 months ago
DIY MOUNTING G-TRAK WALL BRACKETS
Guidelines: Here is the amount of wallspace needed for your wall mount G-TRAK screen.
7ft wide screen = 8ft + wall space
8ft wide screen = 9ft + wall space
10ft wide screen = 11ft + wall space
12ft wide screen = 13ft + wall space
14ft wide screen = 15ft + wall space
The drive tubes are telescopic and can adjust for your specific space. G-TRAK is designed to mount firmly to your wall studs. For example, if you purchased a 7ft wide screen, locate your wall studs for an 8ft + wall space and you will be able to center your G-TRAK accordingly. (must have at least 6” of extra space on each side)
TOP SUPPORT WALL MOUNT BRACKETS
1. Using the guidelines above, locate your left and right wall studs that your G-TRAK top support brackets will be anchored to and mark them with a pencil.
2. Using a pencil mark the left wall stud at 105” from the floor.
3. Using a laser level or measuring from the floor or ceiling mark the right side wall stud.
4. The very top of your G-TRAK top support brackets will be at those 105” pencil marks.

5. There are small L shaped tabs on each bracket that will face on the inside of your brackets. Make sure your brackets are perpendicular to the floor/ceiling and trace out the top and bottom holes on the outside of each top support bracket.

6. These holes will accommodate the ¼” lag bolts and support your G-TRAK system. (you can pre drill with a smaller drill bit if needed)
7. Anchor your top support brackets with the provided ¼’ x 2” lag bolts.

INSTALL YOUR G-TRAK according to the DIY DIRECTIONS FOR GARAGE INSTALLATION
8. At step # 4 you will not be mounting to your garage door tracks and will instead mount to your top support wall mount brackets.

9. At step # 6A you will not mount border track brackets to garage door tracks and will instead insert your large male wall mount arms into each side female slot top support wall mount brackets. (border track plate on the outside)

10. At step # 9 you will not measure 24”as seen in directions and will instead anchor your bottom screen support brackets 6” from the center outside of the screen on each side at the bottom of your wall or baseboard. (use ¼’x2” at least 2 lag bolts on each side. They are designed to catch the kickplate studs at the bottom of most walls.

11. Insert the small male arms on both sides into the female portion with the d-rings facing toward the screen. The pushbutton pin will click when connected.

12. Use the 2 ball bungee cords and loop through the d-ring on the small arm and the grommet at the bottom of the screen. This keeps your screen tight for use.

AT THIS POINT FOLLOW ALONG WITH THE DIY DIRECTIONS FOR G-TRAK GARAGE INSTALLATION
13. When you are finished playing, unhook your top border mesh and your bottom bungee ball cords.
14. Remove large top arm supports and remove bottom small arm supports and store out of the way until next use.

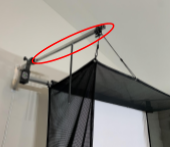
Assembled Position
Stored Position